Passive Solar Home Design Project
Our main objective for this project was:
How can we design a home that is comfortable in all conditions without the use of electricity?
What is the most efficient way to heat and cool a home?
Our need-to-knows for this project included:
How do different materials deal with heat?
What materials should we use in our home?
How do we get heat in the winter, but avoid it in the summer?
How do we get light into the building?
How do we heat water?
How could we get electricity to power the home?
Where should the building be located?
What will the building be used for?
We separated this project into eight steps, each a different lab or project altogether.
1. Design a hot water heater.
This was our very first aspect of the project, done in January. The purpose was to learn to utilize the sun's own energy to heat water, in the most efficient way. We essentially took cardboard boxes, copper piping, black and white paint, aluminum foil, plastic wrap, plastic tubing, and water, and assembled them to create simple heaters. Each contraption ran the same basic process; the water would cycle through plastic tubing into the open cardboard box area that was exposed to the sun, where it would be slightly heated by the copper tubing, to cycle out through the tubing and back in a circuitous motion. We painted our box black on the inside to absorb heat, and then put aluminum foil on the sides to reflect it in the center. We also put plastic wrap over it to trap heat, and used a stopper on the plastic tubing so stem the flow of water to just a small trickle, so we could maximize the time the water spent in the copper pipe. Our heater was among the most successful of the groups, heating an astounding 4.186 degrees Celsius, a rise of 39.535 degrees Fahrenheit, in just under two class periods.
2. Solar angles and how they change during seasons.
Since the Earth tilts on an axis of 23.5 degrees as it orbits the sun, we experience seasons. When the Northern hemisphere is tilted more directly at the sun, it is "summer" in the Northern hemisphere and "winter" in the Southern hemisphere, and vice versa. Using solar angles, we can detect the directness of the sun's rays at any given time. In the wintertime, since the Northern hemisphere is tilted away from the sun, the rays we receive are more slanted, so less of them can fit in a given area. This explains why winters are, very clearly, cold.
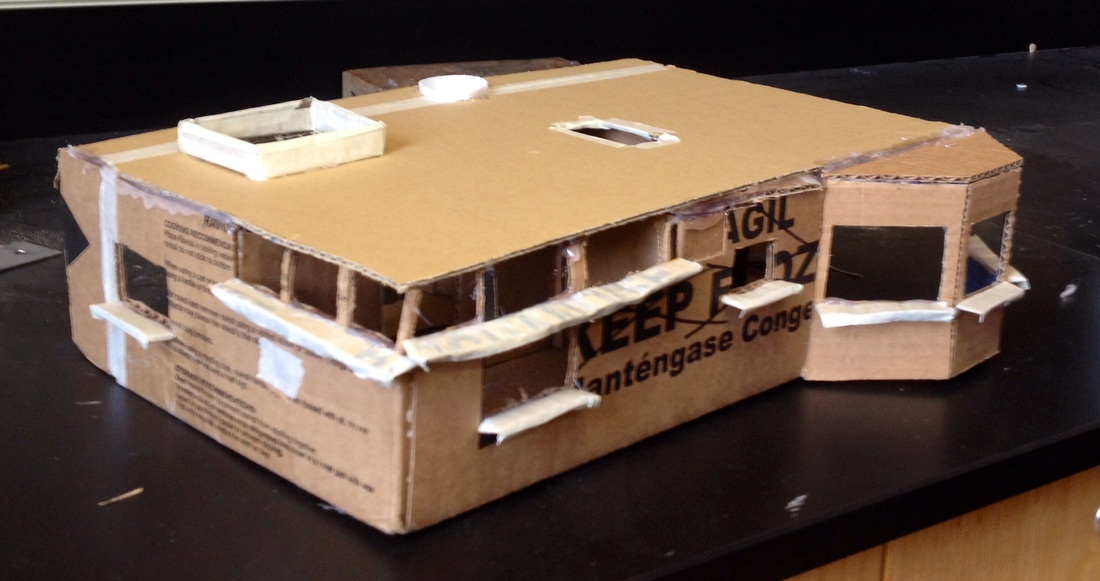
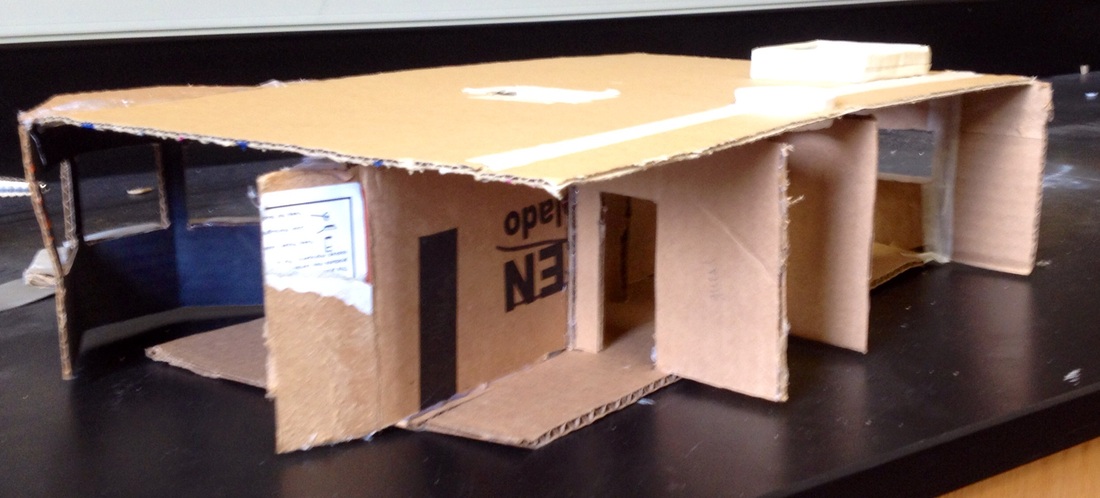
3. Daylighting Design Activity
This activity focused on getting us to use our prior knowledge, gained from previous labs and lectures, to apply to an actual model. Ours was a one story, two bed, two bath house complete with a bay window and multitudes of daylighting techniques. It used two skylights of varying sizes, a light tube, clerestory windows, and light shelves. Skylights are glazed (closed over with glass or plastic) fenestrations used to admit natural light into a building, light tubes transport or distribute light to illuminate rooms, clerestory windows are high-set windows used for daylighting, and light shelves are shelves designed to reflect light into a building. It taught us a lot about location of the sun in relation to our building, orientation of the building, and utilization of all of our resources.
How can we design a home that is comfortable in all conditions without the use of electricity?
What is the most efficient way to heat and cool a home?
Our need-to-knows for this project included:
How do different materials deal with heat?
What materials should we use in our home?
How do we get heat in the winter, but avoid it in the summer?
How do we get light into the building?
How do we heat water?
How could we get electricity to power the home?
Where should the building be located?
What will the building be used for?
We separated this project into eight steps, each a different lab or project altogether.
1. Design a hot water heater.
This was our very first aspect of the project, done in January. The purpose was to learn to utilize the sun's own energy to heat water, in the most efficient way. We essentially took cardboard boxes, copper piping, black and white paint, aluminum foil, plastic wrap, plastic tubing, and water, and assembled them to create simple heaters. Each contraption ran the same basic process; the water would cycle through plastic tubing into the open cardboard box area that was exposed to the sun, where it would be slightly heated by the copper tubing, to cycle out through the tubing and back in a circuitous motion. We painted our box black on the inside to absorb heat, and then put aluminum foil on the sides to reflect it in the center. We also put plastic wrap over it to trap heat, and used a stopper on the plastic tubing so stem the flow of water to just a small trickle, so we could maximize the time the water spent in the copper pipe. Our heater was among the most successful of the groups, heating an astounding 4.186 degrees Celsius, a rise of 39.535 degrees Fahrenheit, in just under two class periods.
2. Solar angles and how they change during seasons.
Since the Earth tilts on an axis of 23.5 degrees as it orbits the sun, we experience seasons. When the Northern hemisphere is tilted more directly at the sun, it is "summer" in the Northern hemisphere and "winter" in the Southern hemisphere, and vice versa. Using solar angles, we can detect the directness of the sun's rays at any given time. In the wintertime, since the Northern hemisphere is tilted away from the sun, the rays we receive are more slanted, so less of them can fit in a given area. This explains why winters are, very clearly, cold.
3. Daylighting Design Activity
This activity focused on getting us to use our prior knowledge, gained from previous labs and lectures, to apply to an actual model. Ours was a one story, two bed, two bath house complete with a bay window and multitudes of daylighting techniques. It used two skylights of varying sizes, a light tube, clerestory windows, and light shelves. Skylights are glazed (closed over with glass or plastic) fenestrations used to admit natural light into a building, light tubes transport or distribute light to illuminate rooms, clerestory windows are high-set windows used for daylighting, and light shelves are shelves designed to reflect light into a building. It taught us a lot about location of the sun in relation to our building, orientation of the building, and utilization of all of our resources.
|
|
4. Site Selection
For our site selection piece, we wandered around campus taking note of empty spaces, with little obstruction of sun from trees or buildings. Each group came up with a list of viable locations, and from there rated each according to things such as 'visibility to the community', 'exposure to direct sunlight', or 'student accessibility'. From there, we would rule out at least one location, and choose our preferred location from there. Our group chose the empty area located along Novato Boulevard, situated between the parking lot by the STEM room and the road leading up to the cafeteria. It had ample access to sunlight early in the morning and late, and all hours in between, as there are not many trees or buildings in the path of the sun. There were no plans to build anything on the site in the future, so our building could be permanent. It was easily accessible, and highly visible to the public community due to its direct placement along Novato Boulevard.
5. Materials testing
We brainstormed a list of viable options of materials for floors, interior walls, exterior walls, insulation, and roofing. Among the best materials for each category were dark hardwood, drywall, stucco, and corrugated metal, all of which we ended up using in our design.
|
Floors:
-carpet -linoleum -hardwood (light/dark) -ceramic tile -cork Interior Walls: -texture/drywall -flat drywall -stone/rock -black/white color Exterior Walls: -redwood -stucco -wood -brick -plastic/PVC -adobe |
Insulation:
-fiberglass -cellulose -coconut fibers -spray foam -polyurethane Roofing: -tar -shingles -corrugated metal -turf/sod -skylight |
6. Building Design
The building design is the meat of our project. Here, we'd be tested on a profusion of skills; from simple organization, attentiveness and care to every previous physical concept presented to us in preparation for this project. Our final product was a 10ft x 12ft room with a slanted tin roof (to drain water), an overhang on all sides (for shade), various daylighting techniques like clerestory windows, white painting inside the building to reflect light and darkk brown outside to absorb it, and dark hardwood floors to absorb heat. We had sheet fiberglass sheet insulation for walls, and double-paned windows do trap heat and warm the room. We had a concrete foundation for the house to sit on as well.
We presented our house design, along with the budget and materials list, listing everything needed to build the house and its quantities and prices, key features sections with highlights on the location, daylighting and heating techniques, slides for the individual blueprints, justification in purpose, and many things in between. We chose to create a tangible model of our design using popsicle sticks as two-by-fours, black and white paint, cotton balls as sheet insulation, and lots of hot glue. It was a cute novelty to have along with our actual presentation.
We presented this on March 12th to a panel of judges, people from the community, students, staff, parents, and other STEM kids. We got tons of constructive criticism as well as compliments regarding our presentation skills and our project in general. I think it was very successful and everyone has loads of fun and we learned a lot.
7. Justification
For our justification piece, every group was individually assigned certain things which we researched and then wrote collectively in a shared Google document.
8. Generation of electricity.
If we wanted to supply our house with electricity yet still remain off-grid, we could produce a wind turbine to utilize kinetic energy from the wind power. There are two primary types of wind turbines, HAWT and VAWT turbines. HAWT turbines - Horizontal Axis Wind Turbines, are the most familiar, and most widely used turbines. This is because they can be placed higher in the air, where air speeds are often faster and result in larger power outlet. They also move perpendicularly to the wind producing power the entire revolution. VAWT turbines - Vertical Axis Wind Turbines, are less familiar, because they are less commonly used. They are less efficient in areas where wind is constant, but are beneficial when wind direction varies, unlike HAWT turbines.
If we wanted to supply our house with electricity yet still remain off-grid, we could produce a wind turbine to utilize kinetic energy from the wind power. There are two primary types of wind turbines, HAWT and VAWT turbines. HAWT turbines - Horizontal Axis Wind Turbines, are the most familiar, and most widely used turbines. This is because they can be placed higher in the air, where air speeds are often faster and result in larger power outlet. They also move perpendicularly to the wind producing power the entire revolution. VAWT turbines - Vertical Axis Wind Turbines, are less familiar, because they are less commonly used. They are less efficient in areas where wind is constant, but are beneficial when wind direction varies, unlike HAWT turbines.
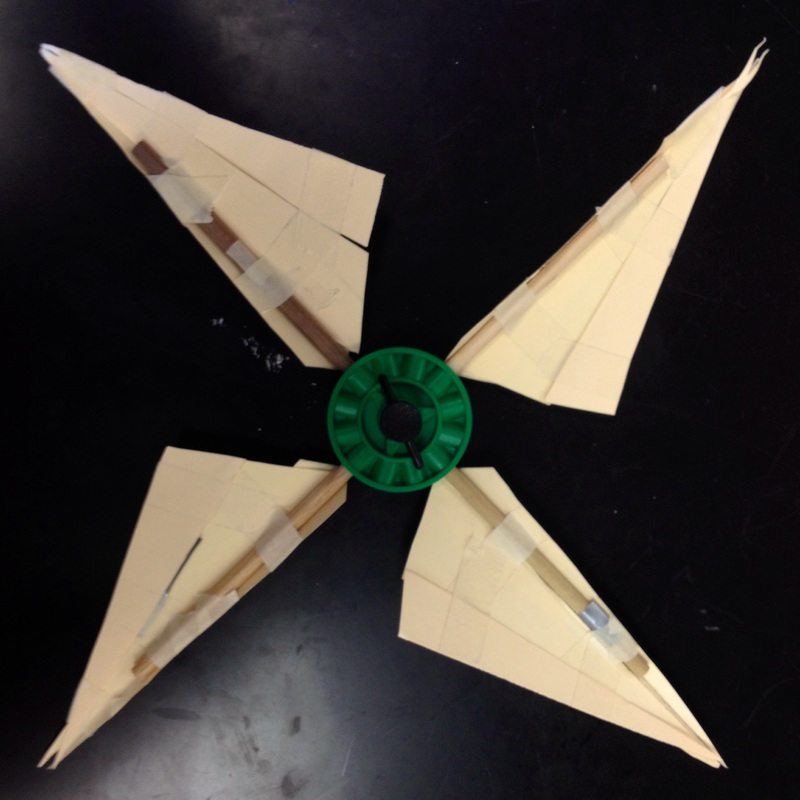
our HAWT turbine
|
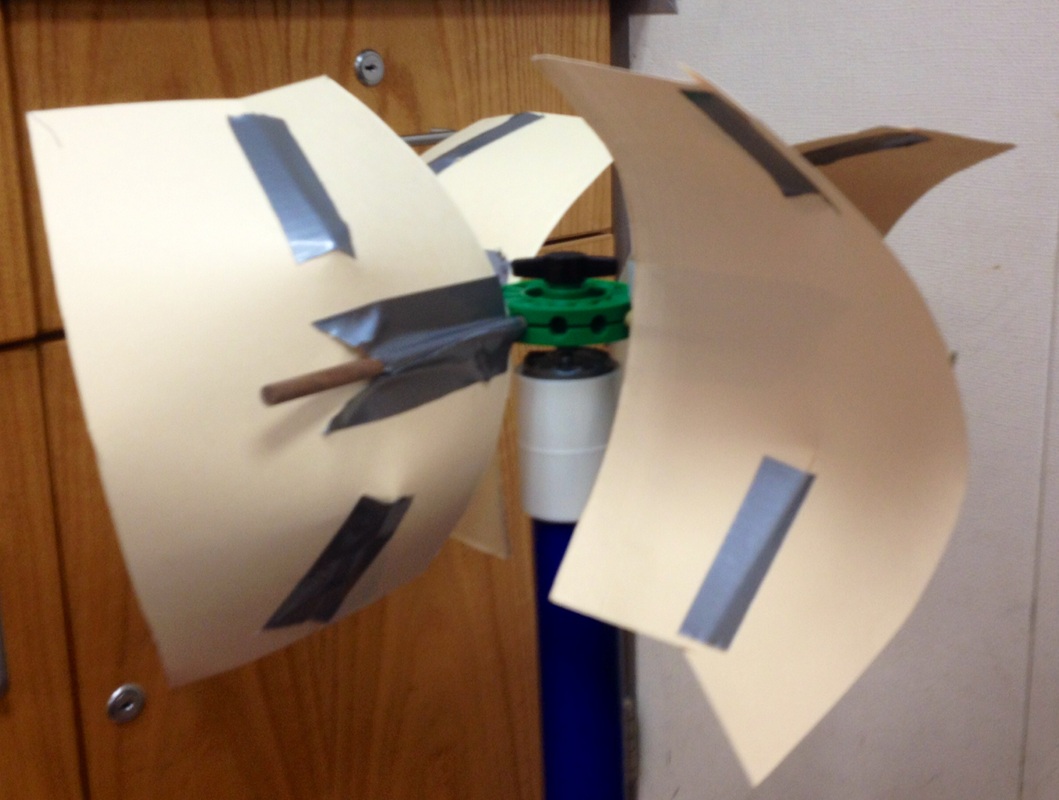
our VAWT turbine
|
Major Physics Concepts
Listed here are all of the major physics concepts we learned and used in our projects at some point.
conduction: the transfer of heat through a solid
convection: the transfer of heat through a liquid
radiation: energy transmitted as waves, rays, or particles through space
heat: a form of energy (1st law of Thermodynamics)
state of matter: determined by the energy and movement of atoms within a substance; the more energy the atoms have, the less dense the substance will be
buoyancy: the ability to float or rise in a fluid
insulation: materials inherently bad at conducting (good at keeping heat)
Bernoulli's Principle: when the speed of a fluid increases, pressure drops.
Archimedes' Principle: the upward buoyant force on an object is equal to the weight of the fluid the object displaces.
Ideal Gas Law: pv=nRT- pressure x volume = # of atoms x constant x temperature
specific heat capacity: materials with a high specific heat capacity take a lot of energy to heat up, but retain the heat for a long time (water), while materials with a low specific heat capacity take very little energy to heat up but expel the energy very quickly.
Laws of Thermodynamics:
0th Law- (explains temperature) if 2 systems are in thermal equilibrium with a third system, they are also in equilibrium. (a=b, b=c, a=c)
1st Law- (conservation of energy) energy is neither created nor destroyed, heat is a form of energy.
2nd Law- entropy increases; disorder increases
3rd Law- temperature can never reach absolute 0; heat always exists
pressure due to liquid: = density x depth; the deeper the fluid, the more pressure it will exert. The denser a liquid is the more pressure it exerts.
Conversion of Temperature: Fahrenheit = Celsius x (9/5) + 32. Celsius = (5/9) (Fahrenheit - 32)
Reflection
This project was by far the longest we've ever done; at three months, it blows the Rube Goldberg project out of the water! I think we all learned so much, this was definitely an amazing test of our skill, perseverance, focus, determination, patience, and not to mention cooperation and empathy. First of all, this project lasted three months. If you didn't like someone in your group, you had to get over it. Thankfully, Eryk, Emily Claire, and Austin are all vigilant and hardworking people, so we had no problems there. That's definitely not to say we had no problem cooperating whatsoever, tensions were certainly running high multiple times throughout our work, but I think we all did a really awesome job getting over it and resolving our conflict.
I think what our group, and what most groups, should have worked on a little bit more was presenting. Of course, Mr. Williams gave us an entire week to practice our presentations, but a week of practice doesn't teach someone how to project their voice, or what to do with their hands while they are talking. All these skills take a lot more working on, and things like class presentations can help a lot with that. I have improved upon this greatly since I started STEM, due to all of the presentations we do all the time, which is thrilling. I can utilize these skills literally my entire life; by learning so early on we're giving ourselves a massive head start in life.
We also need to work greatly on organisation. Not only small things like handwriting and binder cleaning, but stuff like physically cleaning up after ourselves. Mr. Williams would get frustrated with us often because we would leave a giant mess; one that he would have to deal with at break, or fifth period would have to clean up. It is rude, it is a bad habit, and it is disrespectful. Instead of using our last few minutes for checking our work or chatting with a friend, we could use it to clean up our workspace instead.
This project was exciting and challenging, and we (will) have an actual, tangible building on campus that we built ourselves to show for it! It's wonderful publicity for our school, for our STEM program, and for showcasing the outstanding ability of our students. We have something we can be proud of building from absolute scratch, and its useful for us and for the community. This project was fantastic, and I hope future projects are just as wonderful as the past ones have been.
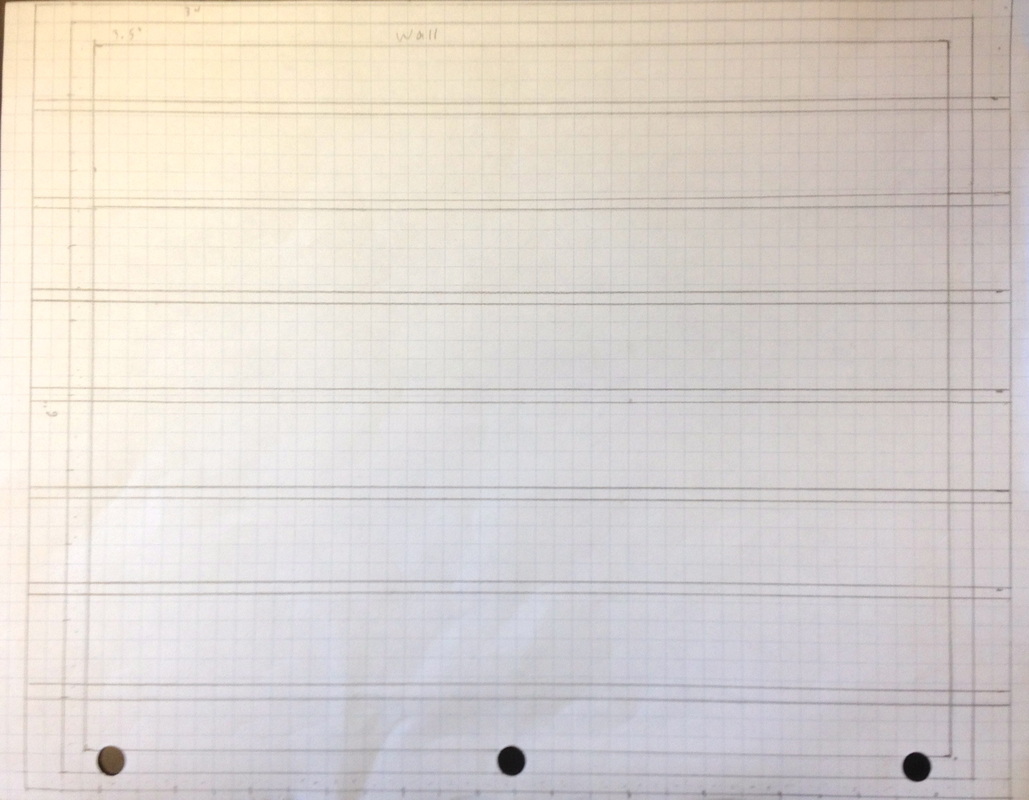

South wall
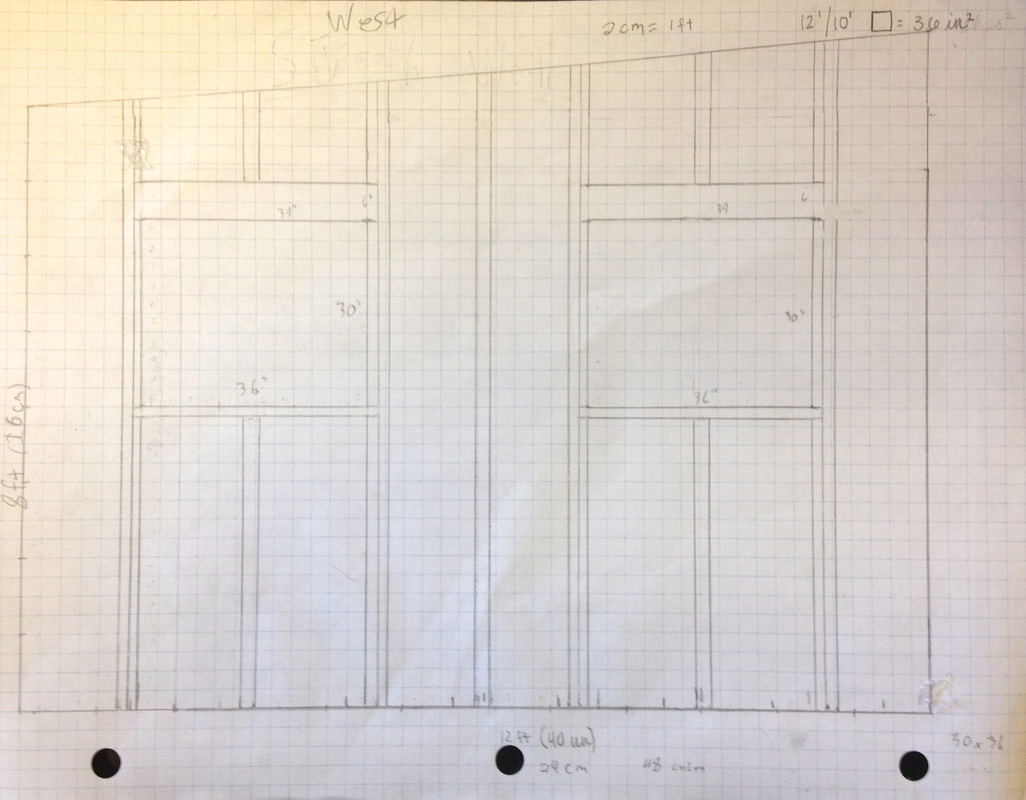
West wall
|
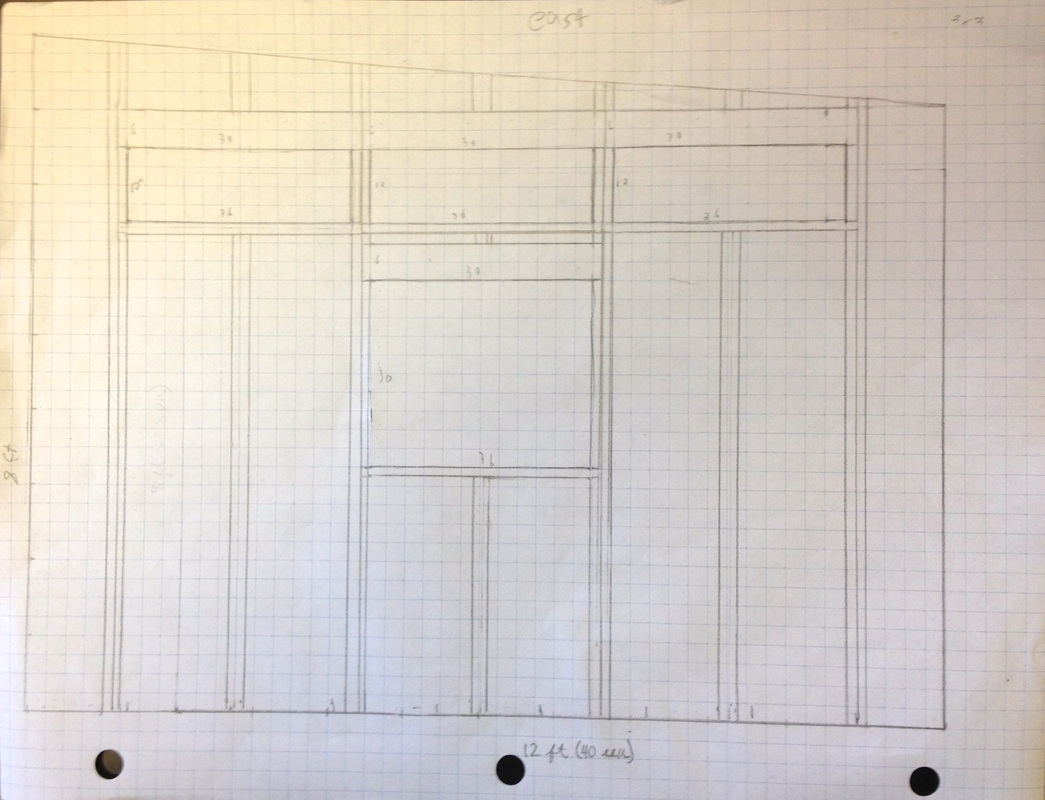
East wall
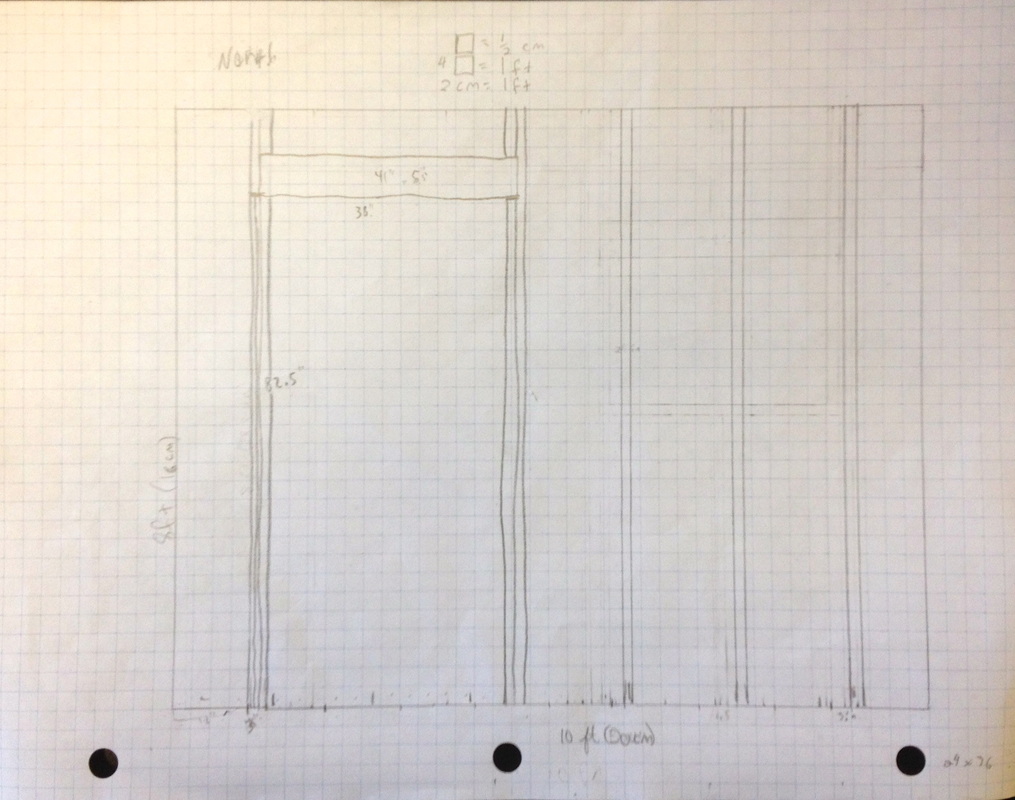
North wall
|
