BUILD A musical band
The objective of this project was to build three separate musical instruments, from three separate families. The families that my group decided on were a wind instrument, a chime instrument, and a string instrument. We chose to build a flute, a xylophone, and a ukulele, respectively. In addition to these instruments, we were originally instructed to make our instruments legitimately functional, and it was suggested that we either learn a song to play on said instruments, or write and possibly perform our own song for extra credit. Our group chose to write the song, but more on that later.
It was soon decided that rather than have our own separate event just for the instruments, we could all demonstrate, or, at the very least, showcase our creations at the STEM ribbon cutting ceremony for our previously build passive solar house.
It was soon decided that rather than have our own separate event just for the instruments, we could all demonstrate, or, at the very least, showcase our creations at the STEM ribbon cutting ceremony for our previously build passive solar house.
Wind instruments typically contain some type of resonator where the column of air that you blow into the instrument is set into vibration. Pitch and tone of the instrument can be altered by blowing faster or slower which would increase the frequency of the wave, or by lengthening and shortening the wavelength in any way, be it by opening and closing holes or lengthening and shortening tubes throughout the instrument. Wind instruments come in tremendous variety, including flutes, clarinets, saxophone, trumpet, trombone, tuba, etc.
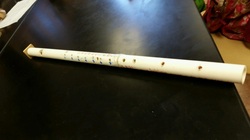
For our wind instrument, we created a simple flute out of PVC piping. We calculated spacing of the holes to give specific wavelengths, and played with hole size and shape to produce our desired sounds.
For our wind instrument, we created a simple flute out of PVC piping. We calculated spacing of the holes to give specific wavelengths, and played with hole size and shape to produce our desired sounds.

String instruments work by strumming, plucking, or hitting strings which vibrate back and forth, creating our sound waves. In order to vary pitch on string instruments, you can increase and decrease string tension, play with string length by making it shorter (which produces a higher note) and making it longer (which produces the opposite). Strings used on instruments also typically have different corresponding thicknesses; thicker strings are harder to vibrate back and forth at a rapid pace, so are more likely to produce a lower note, and vice versa.
We created a ukulele for our string instrument. We created first a classic "acoustic" looking body for our ukulele; the acoustics regarding the inside shape of the body were minimal but having a thick, prominent body allows for more forced vibration on the body, henceforth amplifying our sound. We used nylon ukulele strings, toothpicks for frets, small hook screws as makeshift tuning pegs, and pencils as bridges. Our ukulele also featured a sturdy wooden neck, which ended up buckling under the force of the tightly wound strings at the connecting point to the cardboard body, due to rather weak connections.
We created a ukulele for our string instrument. We created first a classic "acoustic" looking body for our ukulele; the acoustics regarding the inside shape of the body were minimal but having a thick, prominent body allows for more forced vibration on the body, henceforth amplifying our sound. We used nylon ukulele strings, toothpicks for frets, small hook screws as makeshift tuning pegs, and pencils as bridges. Our ukulele also featured a sturdy wooden neck, which ended up buckling under the force of the tightly wound strings at the connecting point to the cardboard body, due to rather weak connections.
Chimes by definition must be hit by another object to commence vibration. To alter chime pitch, you may change the material of which the chimes are made of, adjust diameter and size, and length to produce altering variances in pitch of the instrument.
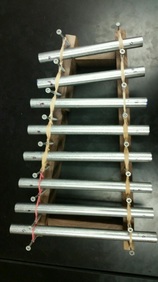
Our chime instrument was by far the cleanest of the three. We chose to make a xylophone, and selected electrical conduit as our material at 1/2" diameter. We cut it into its respective lengths to produce a complete G scale. We built a simple wooden frame and suspended it between screws using rubber bands so that the pipes could vibrate without obstruction.
Our chime instrument was by far the cleanest of the three. We chose to make a xylophone, and selected electrical conduit as our material at 1/2" diameter. We cut it into its respective lengths to produce a complete G scale. We built a simple wooden frame and suspended it between screws using rubber bands so that the pipes could vibrate without obstruction.
Physical Concepts:
wave: a disturbance or vibration throughout a medium
medium: a material in which sound waves (vibrations) can travel through, as in solids, liquids, and gases
sound waves: are created with the vibration of atoms. See: compression, rarefaction
compression: pushing of the atoms together
rarefaction: the pulling of the atoms apart
wavelength: distance from the crest to crest of a wave (top)
amplitude: distance from the midpoint of a wave to the crest or trough (bottom) of the wave
frequency: how often a vibration occurs; is recorded in Hertz (cycles per second)
transverse waves: are waves that move up and down, like light waves
longitudinal (compressional) waves: waves that move in compressing atoms, and horizontally, like sound waves
period: amount of time between waves
interference: two waves are added together. Interference is positive (constructive) when they add to create a larger wave, negative when they create a smaller wave
natural frequency: the frequency at which an elastic object, when energized, will vibrate
resonance: when the frequency of a forced vibration on an object matches the object's natural frequency, which then produces a dramatic increase in amplitude
Reflection:
This project was definitely a learning experience. It was a lot of handiwork, and much of that was tedious, small work, like getting the holes on the flute the right size or tightening strings correctly. It definitely tested my patience some; especially regarding the ukulele. It was extremely difficult to build, especially regarding the tension of the strings. What I've derived from building a cardboard ukulele: unless you are very dedicated and using impossibly strong cardboard with reinforcers, or you want to have a very low-pitched uke on your hands, you shouldn't. It would certainly be a better idea to build a uke out of wood; at least the wood won't be cut by the tension of the strings! It's probably worth the extra effort, at least, if you want a long-term instrument. For the flute, do not drill holes before you do the math. That's what my group did in the beginning, and we ended up getting most of our scale, only slightly off pitch, which drove us insane. We restarted with a new piece of PVC and made a respectable, proper flute with holes drilled according to calculations we did, which turned out a lot better than our first one. As for the xylophone, I can honestly say that we legitimately had zero problems in making it. We did our calculations in the first place, I cut the piping at home, and we created a simple base in class with some scrap wood, nails, and rubber bands to suspend the pipes so they could vibrate without obstruction. And honestly, it turned out wonderfully. The xylophone was by far one of the cleanest projects I've ever done, and it ended up sounding absolutely beautiful. So in summation, this project was labor-intensive at some points and idle in others, but every part really taught me something. My biggest lesson was to definitely do the calculations before you cut, you'll regret it later.
For our song, Daria wrote a little two verse version of the F.U.N. song, only the lyrics are all physics oriented, which makes it more fun! We didn't end up performing it at the ceremony; the mixture of nerves and missing a group member halfway through led to us not performing it, regretfully. But the project really did go well, and that was kind of the icing on the cake.
